– by Rod Machado
Are you ready to rock and roll? If you thought landings were fun, wait till you get hooked on flying the Instrument Landing System (ILS) approach. I talked about it a little in the overview, but we'll go into more details here, since it's one of aviation's most challenging, yet satisfying, aerial activities.
An ILS approach consists of a descent to a runway using both vertical and horizontal electronic guidance. It's accomplished by following two needles (Figure 2-1) located in the ILS display on your instrument panel.
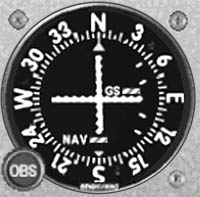 Figure 2-1 |
Unlike other instrument approaches, this one takes you down to a height known as decision height (DH). DH is approximately 200 feet above the runway elevation, as shown in Figure 2-2.
 Figure 2-2 |
From this not-too-lofty perch, you take a peek outside and decide if you can see the runway well enough to land (thus the name decision height). If unacceptable runway visibility prevents a safe landing, you apply power, climb, and head off to someplace else with better weather. Let's take a closer look at how the ILS approach is constructed.
The ILS consists of two electronic beams. One beam is angled outward, and one is angled upward from the runway complex, as shown in Figure 2-3.
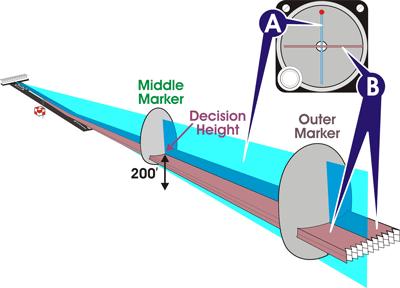 Figure 2-3 |
The outward (horizontal) beam is called the localizer. It helps align your airplane with the runway. You track the localizer by following the needle shown in Figure 2-3 (position A). If the needle is to the right, you go to the right; if it is to the left, you go to the left. A needle that remains centered means your airplane is tracking the runway centerline. Under no-wind conditions, you need only fly the runway heading to keep the localizer needle centered. If there's wind, you need to make small corrections to compensate for wind drift. Sounds easy, but it does take practice to perfect this skill.
The glide slope is an electronic beam that's tilted upward at approximately a 3-degree angle (Figure 2-3). By centering the glide slope needle, shown in Figure 2-3 (position B), you're flying an obstruction-free path down towards the runway. How do you keep the glide slope needle centered? Fly towards it just like a localizer needle. If the needle swings upward, then fly upward; if it swings downward, then fly downward. The objective is to maintain the specific rate of descent that allows the airplane to track the glide slope down to DH.
The Constant Rate Descent
For a typical ILS approach flown at 90 knots, a 500-foot-per-minute (fpm) descent rate is required to remain on glide slope. Of course, if you fly the approach at a faster speed, you must increase your descent rate. Glide slope angle and wind are two factors that affect the precise descent rate required to center a glide slope needle.
Let's suppose you want to fly a descent at a constant rate of 500 fpm at 90 knots (this is a typical profile that you'll use to fly an ILS approach). How should you go about doing this? First, you'll do this by reducing power from its present setting to 1,600 rpm and let the nose naturally pitch down slightly. Then, you'll adjust the pitch as necessary to maintain a descent rate of 500 fpm and adjust the power to maintain 90 knots of airspeed. Yes, this is a reversal of the control functions we used in a previous lesson. Using the controls in this manner allows you to maintain precise control of the descent rate required for an ILS approach.
Here's how the sequence should look.
- Adjust power to maintain 90 knots in level
flight.
A speed of 90 knots requires a pitch attitude of approximately 6 degrees nose-up pitch in level flight. - Reduce power to 1,600 rpm, let the nose pitch
forward naturally, and adjust the pitch to maintain a
500 fpm descent rate.
This requires approximately 3 degrees nose-up pitch on the attitude indicator (AI). - Trim to maintain the attitude for this descent rate.
- Make small adjustments in power to maintain 90
knots.
(Airplanes have inertia, so it may take a few seconds to change speed when moving the throttle. Be patient).
Believe it or not, this is precisely what you'll do when intercepting the glide slope. Since glide slopes are normally intercepted from below, you'll fly level at 90 knots until the needle lowers to a center position in the ILS display (Figure 2-4).
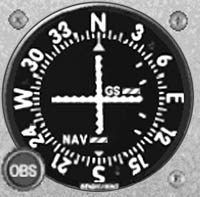 Figure 2-4 |
Once centered, you'll reduce power to approximately 1,600 rpm, adjust the pitch, and trim the airplane for a 500 fpm descent rate, maintaining 90 knots. Assuming you're in perfect harmony with the universe, the airplane will remain on glide slope all the way to DH. But you know how easy it is to get a kink in your chakra, so you can't count on your karma being perfect. Therefore, you'll need to make slight variations in descent rate to keep the glide slope needle centered. Let's examine this.
Let's assume you're above the glide slope and must increase your descent rate to capture it. If you want to change the descent rate from 500 to 700 fpm, you'll need to place the airplane in a 3-degree nose-down pitch attitude, as shown in Figure 2-5.
 Figure 2-5 |
You'll need to reduce power to keep the airspeed at 90 knots. The secret to maintaining a specific rate is not to chase the VSI needle. Simply place the airplane at the precise attitude on the AI, and then make small pressure changes on the joystick to adjust the rate of descent.
Let's assume you've captured the glide slope and want to change the descent rate back to 500 fpm. Do so by increasing the pitch to 3 degrees nose-up and increasing power to approximately 1600 rpm.
Now assume you're below the glide slope and must decrease your descent rate to capture it. Change the descent rate from 500 to 300 fpm by placing the nose in a level pitch attitude, as shown in Figure 2-6.
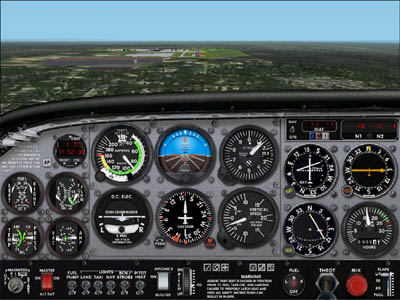 Figure 2-6 |
Increase the power to approximately 1,700 rpm to maintain 90 knots.
Remember, don't chase the VSI needle. Make pitch changes on the AI, followed by small pressure adjustments on the joystick to fine-tune the VSI's indication.
Radial-Scanning Primary Instruments
ILS approaches are not the place to catch a little shut-eye. Following the ILS needles to decision height is a demanding task. That's why you never leave Step 2 of the three-step instrument scan. In other words, you spend almost all of your time radial-scanning the primary instruments for a constant rate descent. Figure 2-7 shows the primary instruments for an ILS approach.
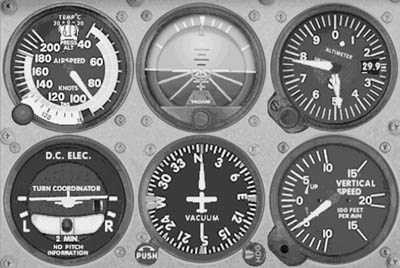 Figure 2-7 Primary Instruments for an ILS Approach. Airspeed, primary for power; Directional Gyro, primary for bank; Vertical Speed, primary for pitch. |
The VSI is primary for pitch; the HI is primary for bank, and the AI is primary for power. These instruments are radial-scanned along with the ILS display (you don't, however, need to radial-scan the airspeed indicator that often). Therefore, these three instruments are continuously radial-scanned when flying an ILS, with other instruments occasionally included. Things are far too busy to perform the monitor scan found in the final step of the three-step scan.
Additionally, not all glide slopes are created equal; some are angled differently than others. Therefore, they may require different descent rates based on the airplane with which they are flown. Figure 2-8 shows the descent rates versus different groundspeeds required to fly various glide slopes based on this approach.
 Figure 2-8 |
At 90 knots, for this 3-degree glide slope, a 485 fpm descent rate should keep you right on target.
Now it's your turn. If you're having trouble tracking the localizer, look at the runway ahead of you and visually align yourself with it. Observe how easy it is to fly a constant heading when looking at an actual runway. Why is it easier? Because you get pitch, bank, and alignment information in one "over-the-nose" picture. When you can't look outside, it takes a trained instrument scan to acquire the same information from three different instruments: the AI, the HI, and the ILS display, respectively.
A Few Important Secrets
Now you have the basic idea about how ILS approaches are flown. So here's what the pros know: First, the most important instruments to radial-scan are the HI and the VSI. It's not necessary to radial-scan the airspeed indicator or the ILS display every time. In fact, you might limit your radial-scan of the airspeed indicator to, perhaps, once for every 10 radial-scans of HI and VSI. You can also reduce your radial-scan of the ILS display to once every three scans of the HI and VSI. Of course, you want to take in the altimeter, tachometer, and other assorted instruments on occasion, as time permits. Once you've found a heading and a descent rate that allows you to track the ILS, you must fly those values precisely until you have a reason to change them. And I do mean precisely: Good instrument pilots can hold a heading to a single degree and a descent rate to within plus or minus 25 fpm. Honest! But it does take a lot of practice.
In turbulence, it's easy to have your heading and VSI indication bouncing all around. In these situations, it's best to fly averages. Do this by relying more on the AI for pitch and bank control. Find the pitch that allows for the approximate desired descent rate. Fly this pitch and keep the wings level on the AI.
Additionally, it's sometimes necessary to make small, but jerky, motions on the joystick when flying a simulator. Unlike the actual airplane, you can't sense a change in pressure on the flight controls. This prevents you from anticipating a change in attitude. Furthermore, airplanes have rudders, which help fine-tune the airplane's directional control. You may not have rudders available with your simulator hardware. In that case, small, jerky motions on the joystick are sometimes necessary to keep the airplane at precise attitudes. If you do have rudder pedals or a rudder joystick, keep your motions nice and smooth!
Wind Correction on the Localizer
I recall the first time I told my dad that I needed some space as a teenager. He locked me out of the house and said, "Now you've got all the space you need." At that precise moment, I understood the power of feedback. Feedback changed my behavior, as I know it will change yours, especially in reference to flying the localizer.
When you first begin flying the ILS, head the airplane in the direction of the localizer. In the case of Oakland, the localizer direction is 294 degrees. Fly 294 degrees, and watch the needle's movement. You want feedback in the form of localizer needle movement. In particular, you want to know which way and how much the needle moves as you hold 294 degrees.
The movement of the localizer needle tells you two things: wind direction and wind speed (determined by how fast the needle moves). Once the needle moves from its center position (use a one-dot horizontal deflection), recenter it using a 5- to 10-degree intercept angle (IA). The smaller the intercept angle, the less likely it is that you'll overcorrect. Of course, if you use a 10-degree intercept angle and the needle doesn't move back to center or moves farther from center, then a larger intercept angle is necessary. You also know that you'll need at least a 10-degree wind-correction angle once you're reestablished on the localizer.
Once the localizer needle is centered, apply a small correction for wind. Try a 1-, 5-, or 10-degree wind-correction angle (WCA) based on your best estimate of the winds. With the WCA established, watch the localizer needle. If it returns to center, you know that the WCA is an angle between the WCA and the localizer direction.
For instance, upon intercepting the localizer at Oakland, you fly 294 degrees. In a few seconds, the localizer needle begins moving to the left. You fly a heading 10 degrees to the left of 294 degrees, or an IA of 284 degrees, to reintercept the needle. When the needle recenters, you apply a 5-degree WCA to the left of 294 degrees (289 degrees). If this WCA works, the needle will stay centered. If not, repeat the process using smaller heading changes to recenter the needle. This technique is called bracketing, and it's the technique all professional pilots use (with slight modification) to center VOR and localizer needles.
Practicing this technique is sure to save you embarrassment during later flights. The last thing you want is the localizer needle banging against the instrument case. That's when the passengers start asking those annoying little questions like, "Hey, what's that clicking noise? You got your blinker on, Bud? Is that a time bomb, or what?"
Now, click the Fly This Lesson Now link to practice what you just learned about ILS approaches. You'll have fun—trust me!